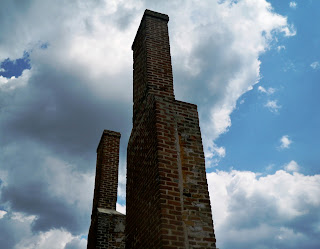
Location: Richmond National Military Park, Henrico County VA
Miles: 1.5 Miles
Miles: 1.5 Miles
Difficulty: Easy to Moderate
Overview: This trail is one of my favorite low mileage battlefield hikes. This unspoiled battlefield has great sweeping views due to the trail mostly following open fields. Due to the small size and straightforward assault by the Confederates, the battle tactics are easy to follow and there are many interpretive signs to explain the action along the way. During the busier summer weekends, there is usually a park ranger at the parking area that will be able to give you much more information that I can here. Finally, during the many times I have visited this battlefield, it has never had more than a few visitors and sometimes I have had the entire battlefield to myself.
I like to start my hike at the Union Artillery pieces along Malvern Hill. From this vista, you can see the advantages of Col. Henry Hunt’s artillery placement. The cannons placed on this crest could sweep the entire field of battle. Follow the hiking trail to the right towards the white house across Willis Church Road. The West house is not the original from the battle, but was built on the same foundation of the original house.
After pasting more Union artillery and the West house, the trail bears left. Across this field, Confederate Maj. Gen. D.H. Hill’s men attacked and were repulsed by a heavy artillery barrage and Union Brig. Gen Darius N. Couch’s Division who rushed out from behind the cannons to stop the Confederates.
Continue down the trail towards the road. This is where Confederate Maj. Gen. Stonewall Jackson’s men arrived before sunset. His men where delayed at White Oak Swamp and did not make a major contributing during the battle.
Follow the trail back across Willis Church Road to the brick chimneys. These ruins are from the Willis Church Methodist Parsonage. This house was a landmark during the battle as many of Confederate troops traveled through this area on their way to assault the Union lines and Maj. Gen. D.H. Hill met with his officers behind the building.
The trail now enters the woods behind the ruins. This area was wooded at the time of the battle and provided shelter to the Confederate troops as they fell back from the Union lines. Federal artillery tried to dissuade the Confederates from using the woods as cover by lobbing shells into the treetops. There is also a marker where Confederates were buried after the battle and later moved to Richmond or other southern cemeteries.
Follow the trail out of the woods, across Carters Mill Road, to the Confederate cannons. Confederate artillerists tried to place their cannons here to help with the infantry attack but were overwhelm by a destructive shower of projectiles from the Union cannons.
The trail now turns left and begins to head back towards the Union line. This is the area where Confederate Brig. Gen. Lewis A. Armistead’s men traveled to attack the Union defenses. A steep cliff to your right helped to funnel the Confederate troops into the deadly teeth of the Federal cannons.
Follow the trail as it nears the crest of Malvern Hill. At the time of the battle, the field was filled with stacks of harvested wheat that provided little shelter for the troops. Here is the closest that Confederate troops got to the Federal line.
At the time of the battle, there were two wooded slave cabins in the area that Confederate Brig. Gen. Paul J. Semmes’ Brigade used for cover. Some of Semmes’ Louisiana men nearly overtook the cannons ahead of you before Brig. Gen. Thomas Meagher “Irish Brigade” rushed in front of the artillery and fought off the Louisianans.
Lining the crest in front of you was 29 Union cannons. Six 12-pounder Napoleon cannons from the 5th U.S. artillery where firing from this section. During the course of the battle, this battery fired 1,392 pounds of shells and canister. The Confederates also had to contend with three gunboats on the James River that hurled huge shells onto the battlefield.
Remain on the trail until it splits ahead. Turn right and follow the spur trail past the Crew House. Like the West House, this not the original building but was rebuilt on the foundation after the original burned down in the 1870’s.
At the time of the battle, these woods were wheat fields. Confederate Maj. Gen. John B, Magruder’s men attack the Union flank from this position. Steep terrain helped to slow down the advance along with well-positioned artillery next to the Crew House. Gen. Magruder’s troops nearly overtook this position but were hurled back by a timely attack by the 14th New York Infantry. This was the Confederates last hope of overtaking Gen. McClellan’s position. Retrace your steps back to the crest of Malvern Hill and locate you car. This completes the Malvern Hill Battlefield Hike.


A discussion was held with a highly reliable historian/Ranger that told me there was NEVER any comprehensive efforts to remove buried Confederates, a couple thigh bones were removed because they were exposed much later after the battle, and those who were dead on top of the grounds were relocated but those who were buried after sunset are still there unmarked in ravine at the bottom of Malvern Cliffs.
ReplyDelete